
How to Measure Yourself for a Custom Suit at Home: The Complete 26-Point Measurement Guide (Net Body Size)
Estimated reading time: 14 minutes
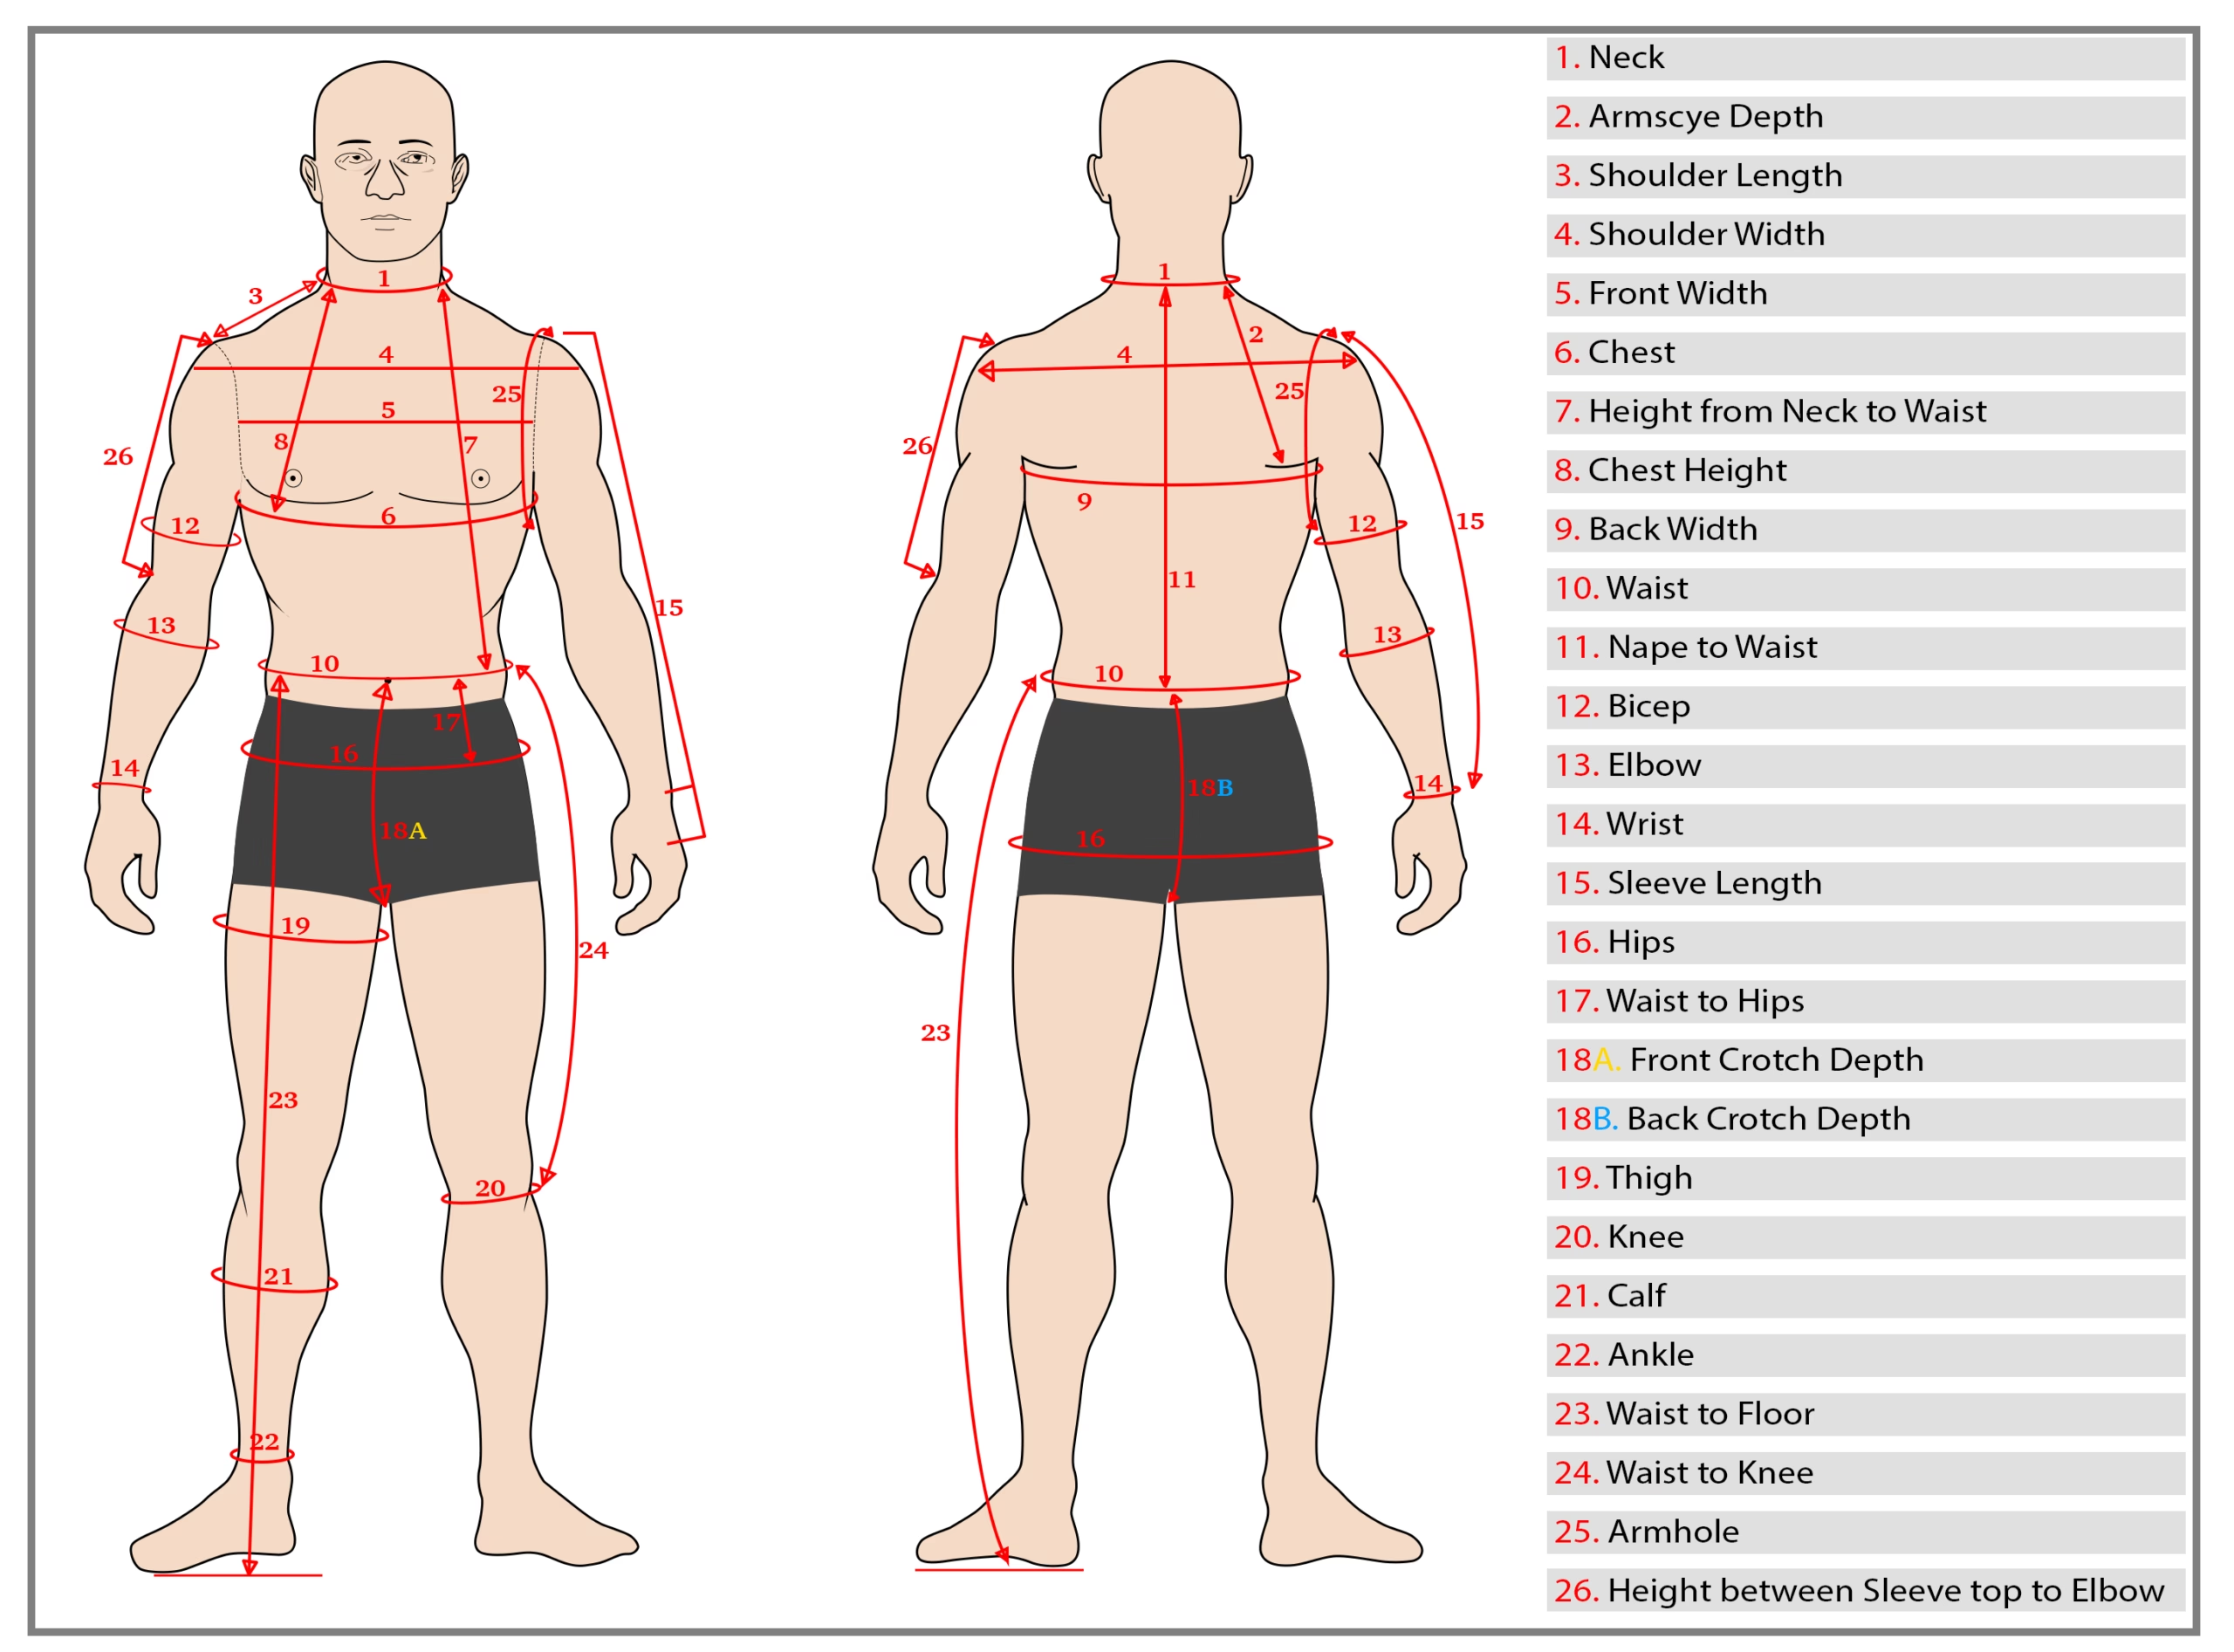
The biggest fear men have about ordering a custom suit online isn’t the fabric or the price — it’s this: “How will they know my size without seeing me?”
Here’s our answer: you’re going to tell us precisely, through 26 carefully taken measurements.
Twenty-six sounds intimidating until you realize it takes about 30–40 minutes, requires nothing but a soft tape measure and a mirror, and replaces every guesswork-based size chart ever printed. Where ready-to-wear brands force your body into S/M/L boxes, made-to-measure reverses the equation — the pattern is drafted from your numbers, not selected against them.
This guide walks you through all 26 points, in the same order as our official measurement chart. Take your time, follow the technique notes for each one, and you’ll produce measurements accurate enough for a lifetime wardrobe.
Before You Start: Six Rules That Make or Break Your Results
1. Use a soft tailor’s tape measure — flexible fabric or vinyl. Metal hardware-store tapes won’t curve around your body and will ruin circumference readings.
2. Wear fitted underwear or light gym wear. Every extra layer adds phantom centimeters. Do not measure over sweaters or jeans.
3. Stand naturally. No flexing, no inhaling, no posture correction. We’re building clothes for your real body in real life — not an idealized pose you hold for 40 seconds.
4. The Golden Rule of tape tension: snug against the skin, never compressing it. If the tape indents your flesh, loosen it. Tight taping is the #1 cause of self-measured suits being too small.
5. Check the tape from the side. Circumference tapes love to slide down at the back. Take a side-profile look in the mirror before locking in any horizontal number.
6. Measure twice, record once properly. Take each measurement twice. Readings differing by more than 1 cm mean you took one wrong — take a third and average the two closest. Record everything in centimeters, in one session, in good lighting.
Part I: The Torso Foundations (#1, #6, #10, #16)
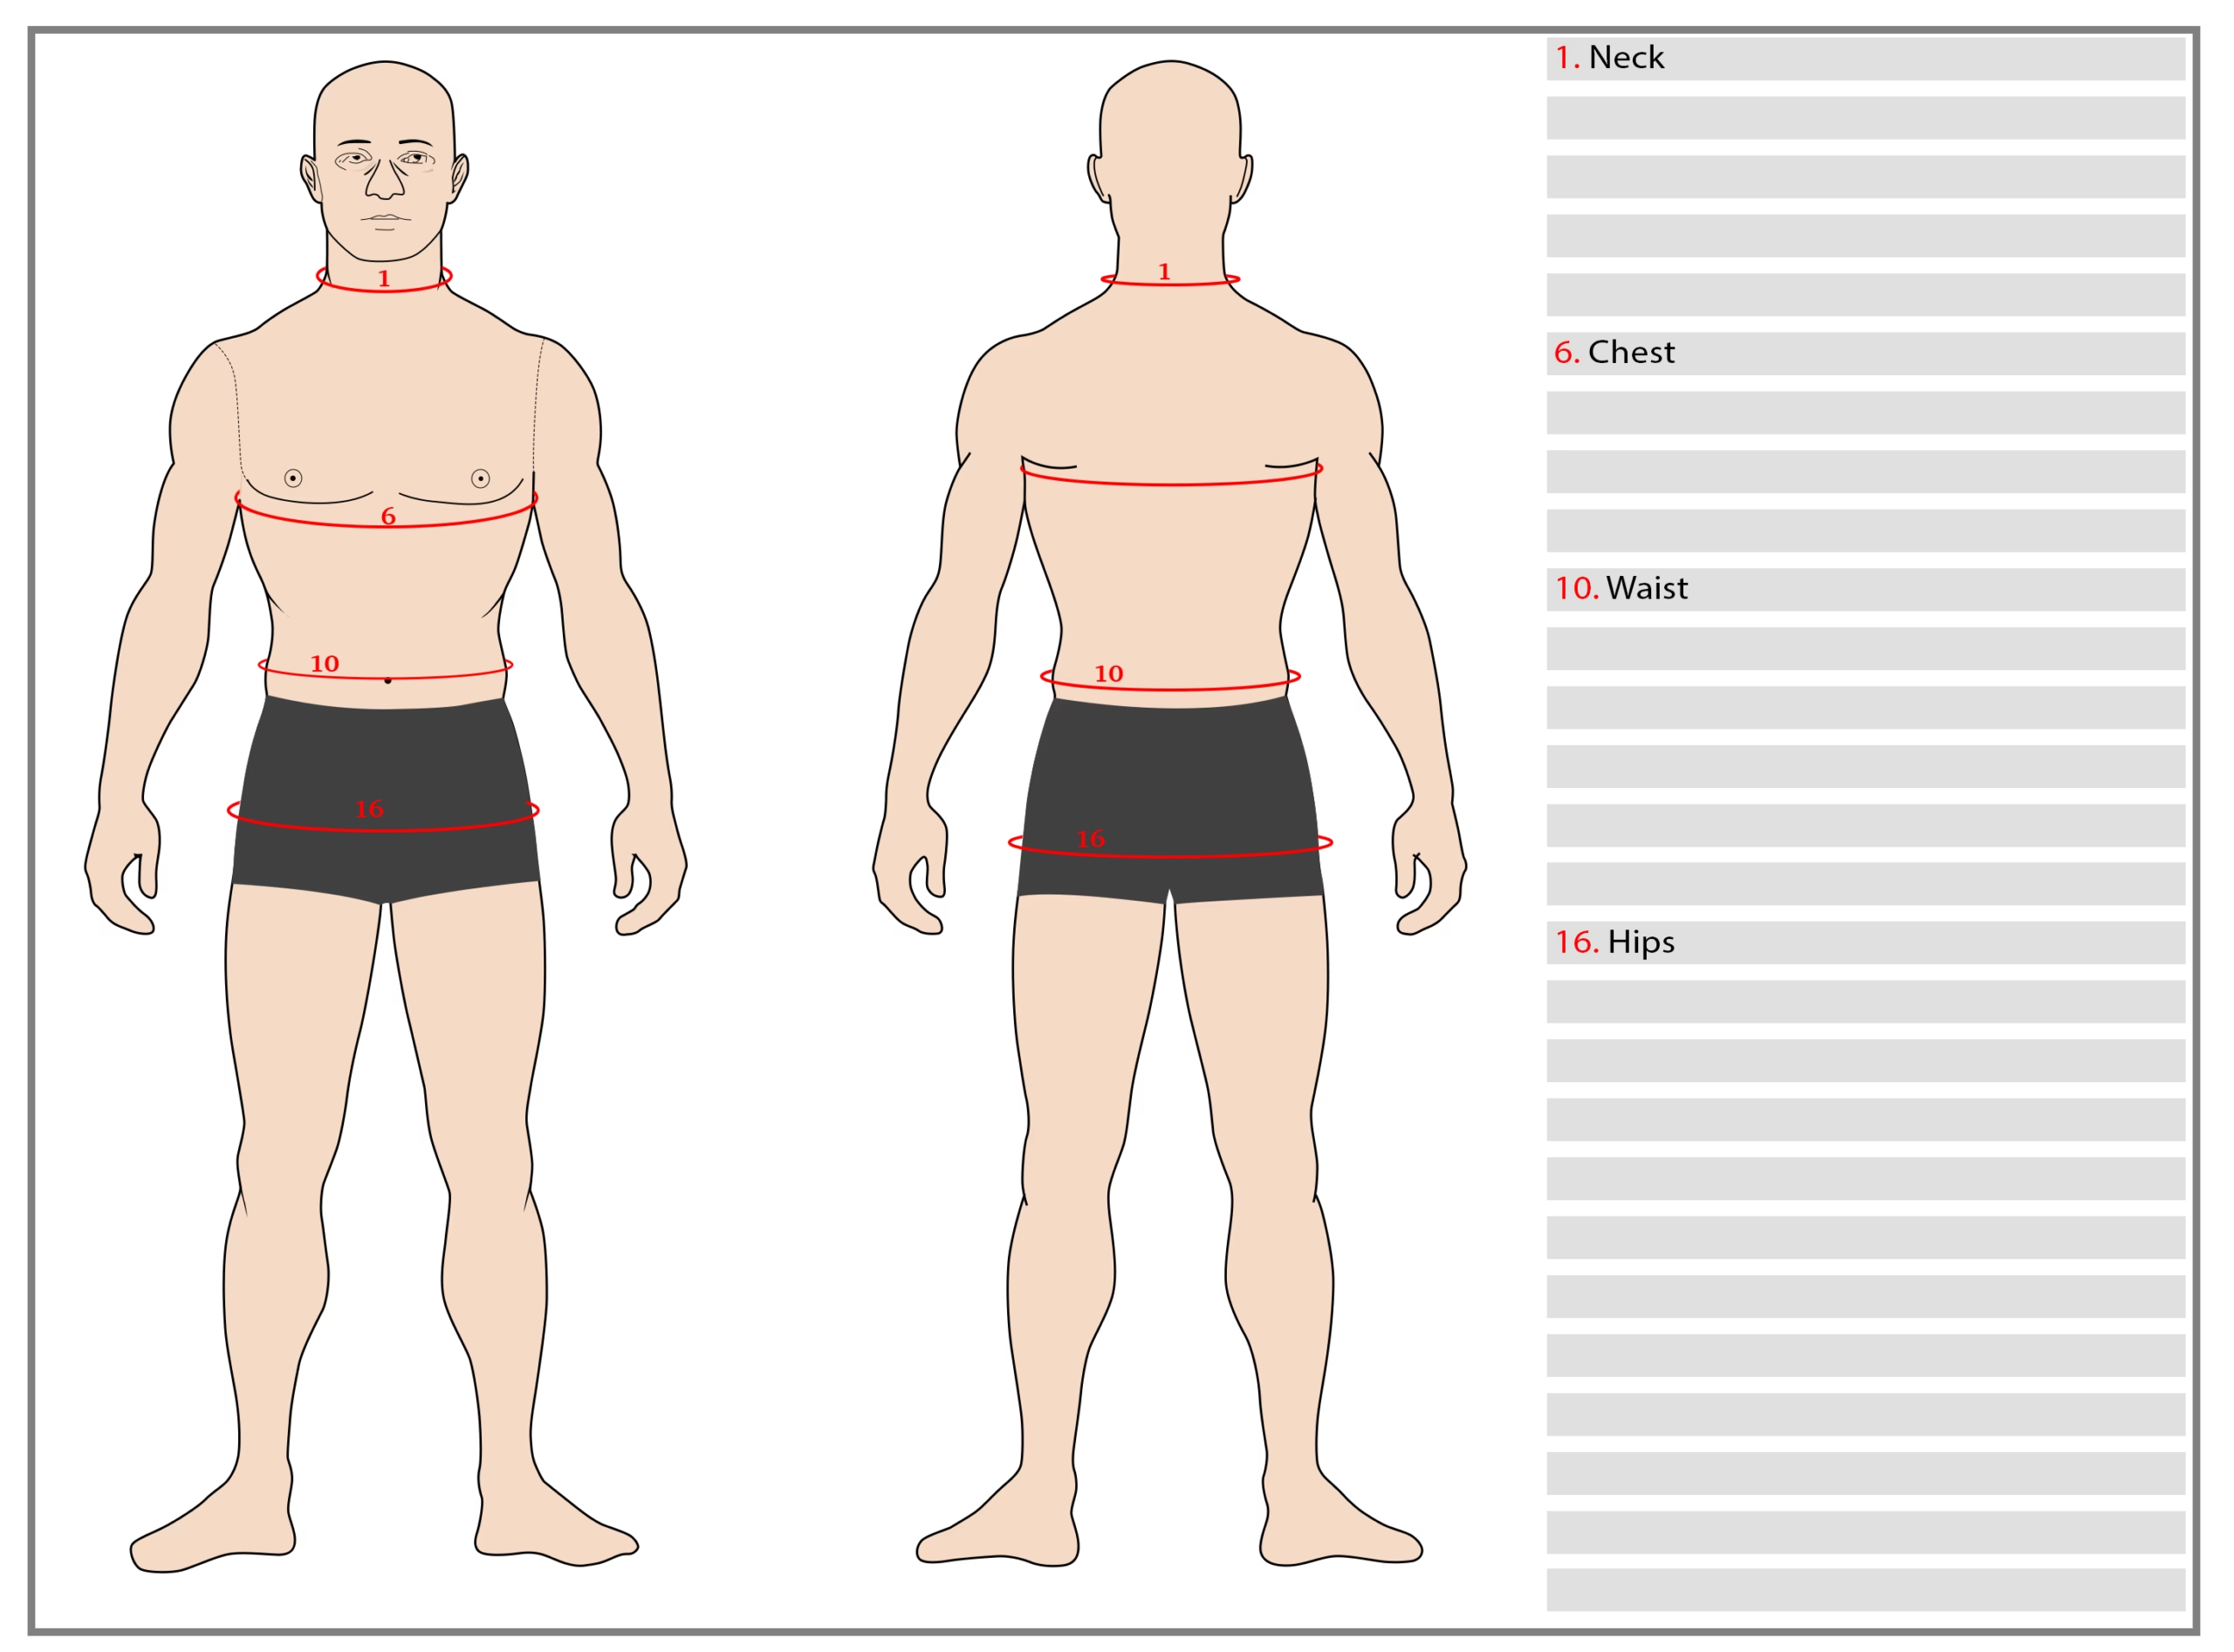
Start with the four great circumference loops. They anchor everything else on the chart.
#1 Neck
Wrap the tape around the base of your neck, roughly where your shirt collar sits — about two fingers’ width below your Adam’s apple.
- Breathe normally; measure at the end of a relaxed exhale.
- No ease is added manually — just capture the natural circumference.
Used for: jacket collar construction.
#6 Chest — The Most Important Number on the Chart
Wrap the tape around the fullest part of your chest, directly across both nipple points.
- Keep the tape perfectly parallel to the floor — check the mirror’s side view to make sure it hasn’t slid down behind your back.
- Exhale gently and measure. Do not inflate.
- Drop your arms to a relaxed position when not adjusting the tape — but raise them briefly to position it correctly around your back.
Used for: jacket draft width, lapel roll behavior, overall silhouette.
#10 Waist
Measure around your natural waistline — typically right at or slightly below the navel, the narrowest point of your torso.
 This is not where modern jeans sit on your hips. Feel for the natural dip on your side; measure there.
- Stand relaxed. Do not suck in. The trouser waistband lives here — dishonesty will be felt at every dinner.
#16 Hips
Wrap the tape around the fullest part of your seat/glutes, feet together.
- Again: parallel to the ground, snug not tight.
- Needed so trousers drape cleanly instead of gripping.
Part II: Shoulder Architecture (#2, #3, #4, #5, #9, #25)
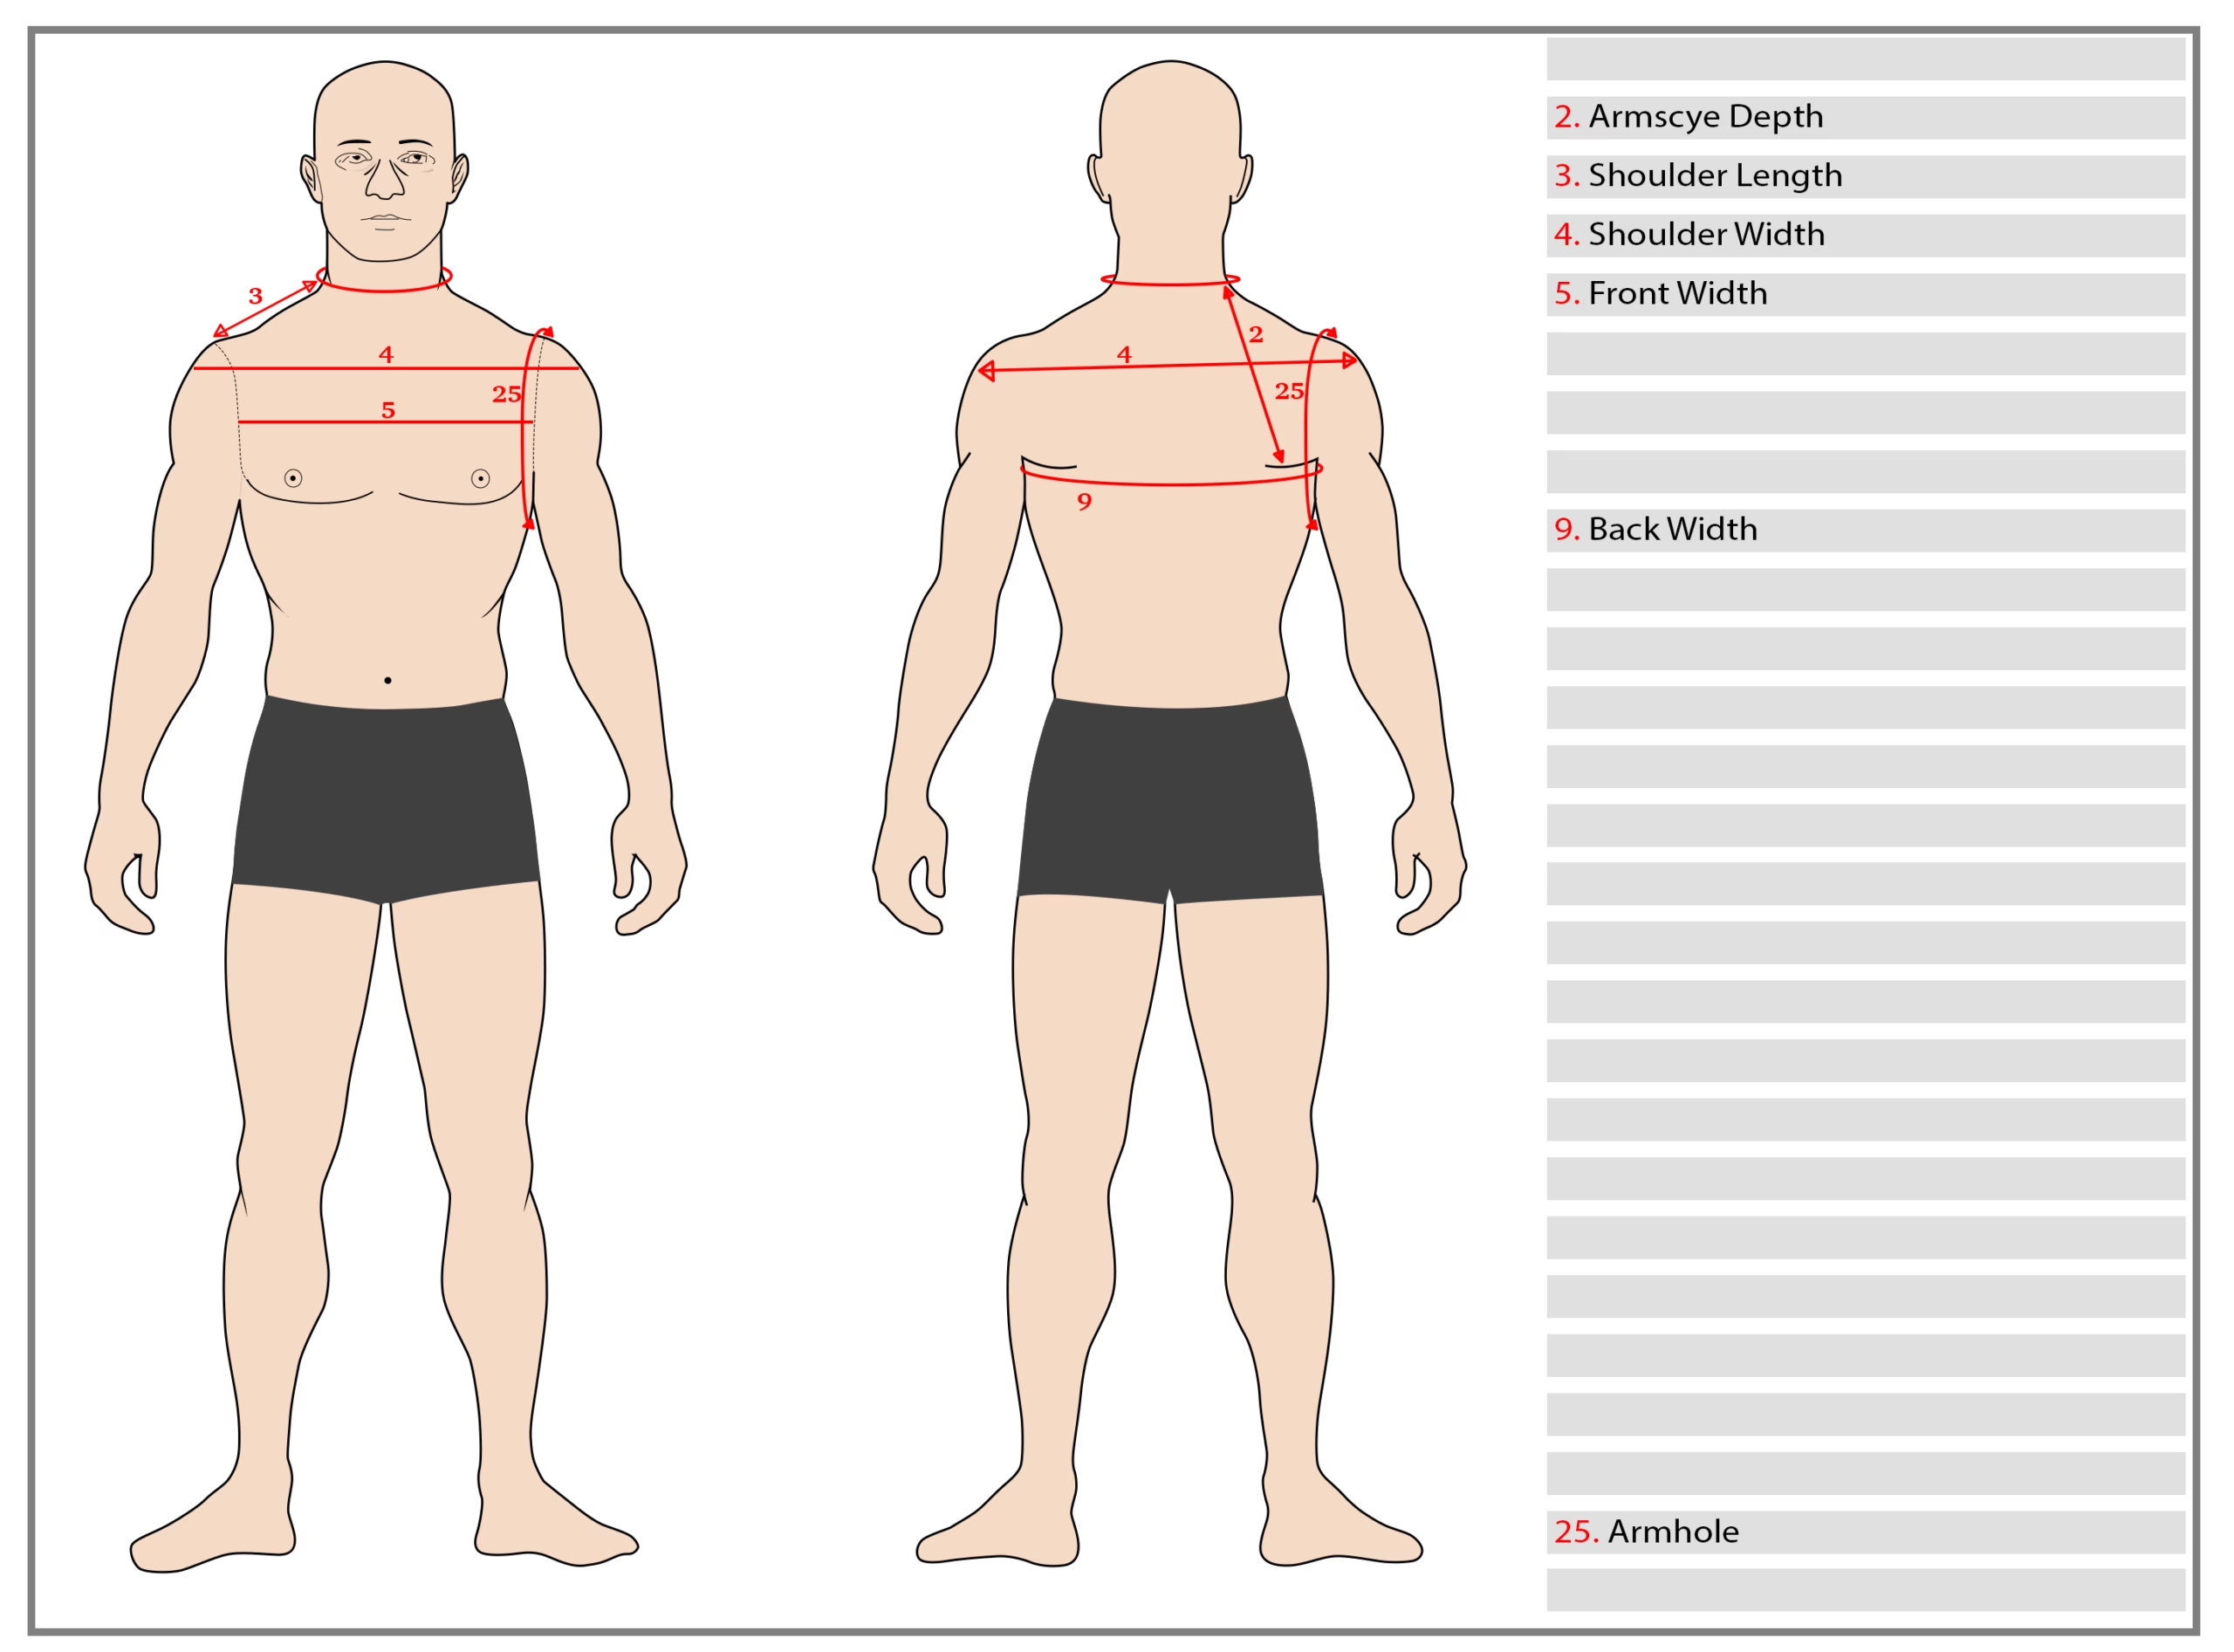
These six define how a jacket sits at the most expressive zone of menswear — the shoulder line and upper frame.
#3 Shoulder Length
Measure from the neck point (where the side of your neck meets the trapezius muscle) outward along the shoulder slope to the shoulder tip (the bony acromion).
- One side only, along the body’s surface.
- Locate both landmarks by pressing gently — the shoulder tip feels like a hard knob.
#4 Shoulder Width
Across the back: measure shoulder-tip to shoulder-tip horizontally, skimming over the upper back curve.
- Useful sanity check: this should equal roughly (shoulder length × 2) plus the width of your neck base.
#5 Front Width
Across the front of your body: measure horizontally between the front folds of both armpits, about halfway between armpit and nipple level.
- Arms hang naturally by your sides; measure under the raised tape, or have the tape pass beneath relaxed arms.
- Don’t puff the chest forward — stand neutrally.
#9 Back Width
Across the back: horizontal distance between the rear folds of both armpits, across the widest plane of the shoulder blades.
- Shoulders fully relaxed, not pulled back. Slouching-free but military-posture-free too.
#2 Armscye Depth
Measure vertically down from the base of the side neck (same neck point used in #3) straight down the chest side to the armpit fold level.
- Hold the tape vertically against the side of the torso.
- This tells us how high or deep to cut the armhole — low enough for comfort, high enough for elegant movement.
#25 Armhole (Full Circumference)
From the top of your shoulder, wrap the tape around the entire armpit loop: over the shoulder point, under the armpit, back up.
- Lift the arm slightly to route the tape underneath, then lower the arm fully before reading the final number.
- Snug into the actual crease of the armpit.
Part III: Vertical Torso Mapping (#7, #8, #11, #17)
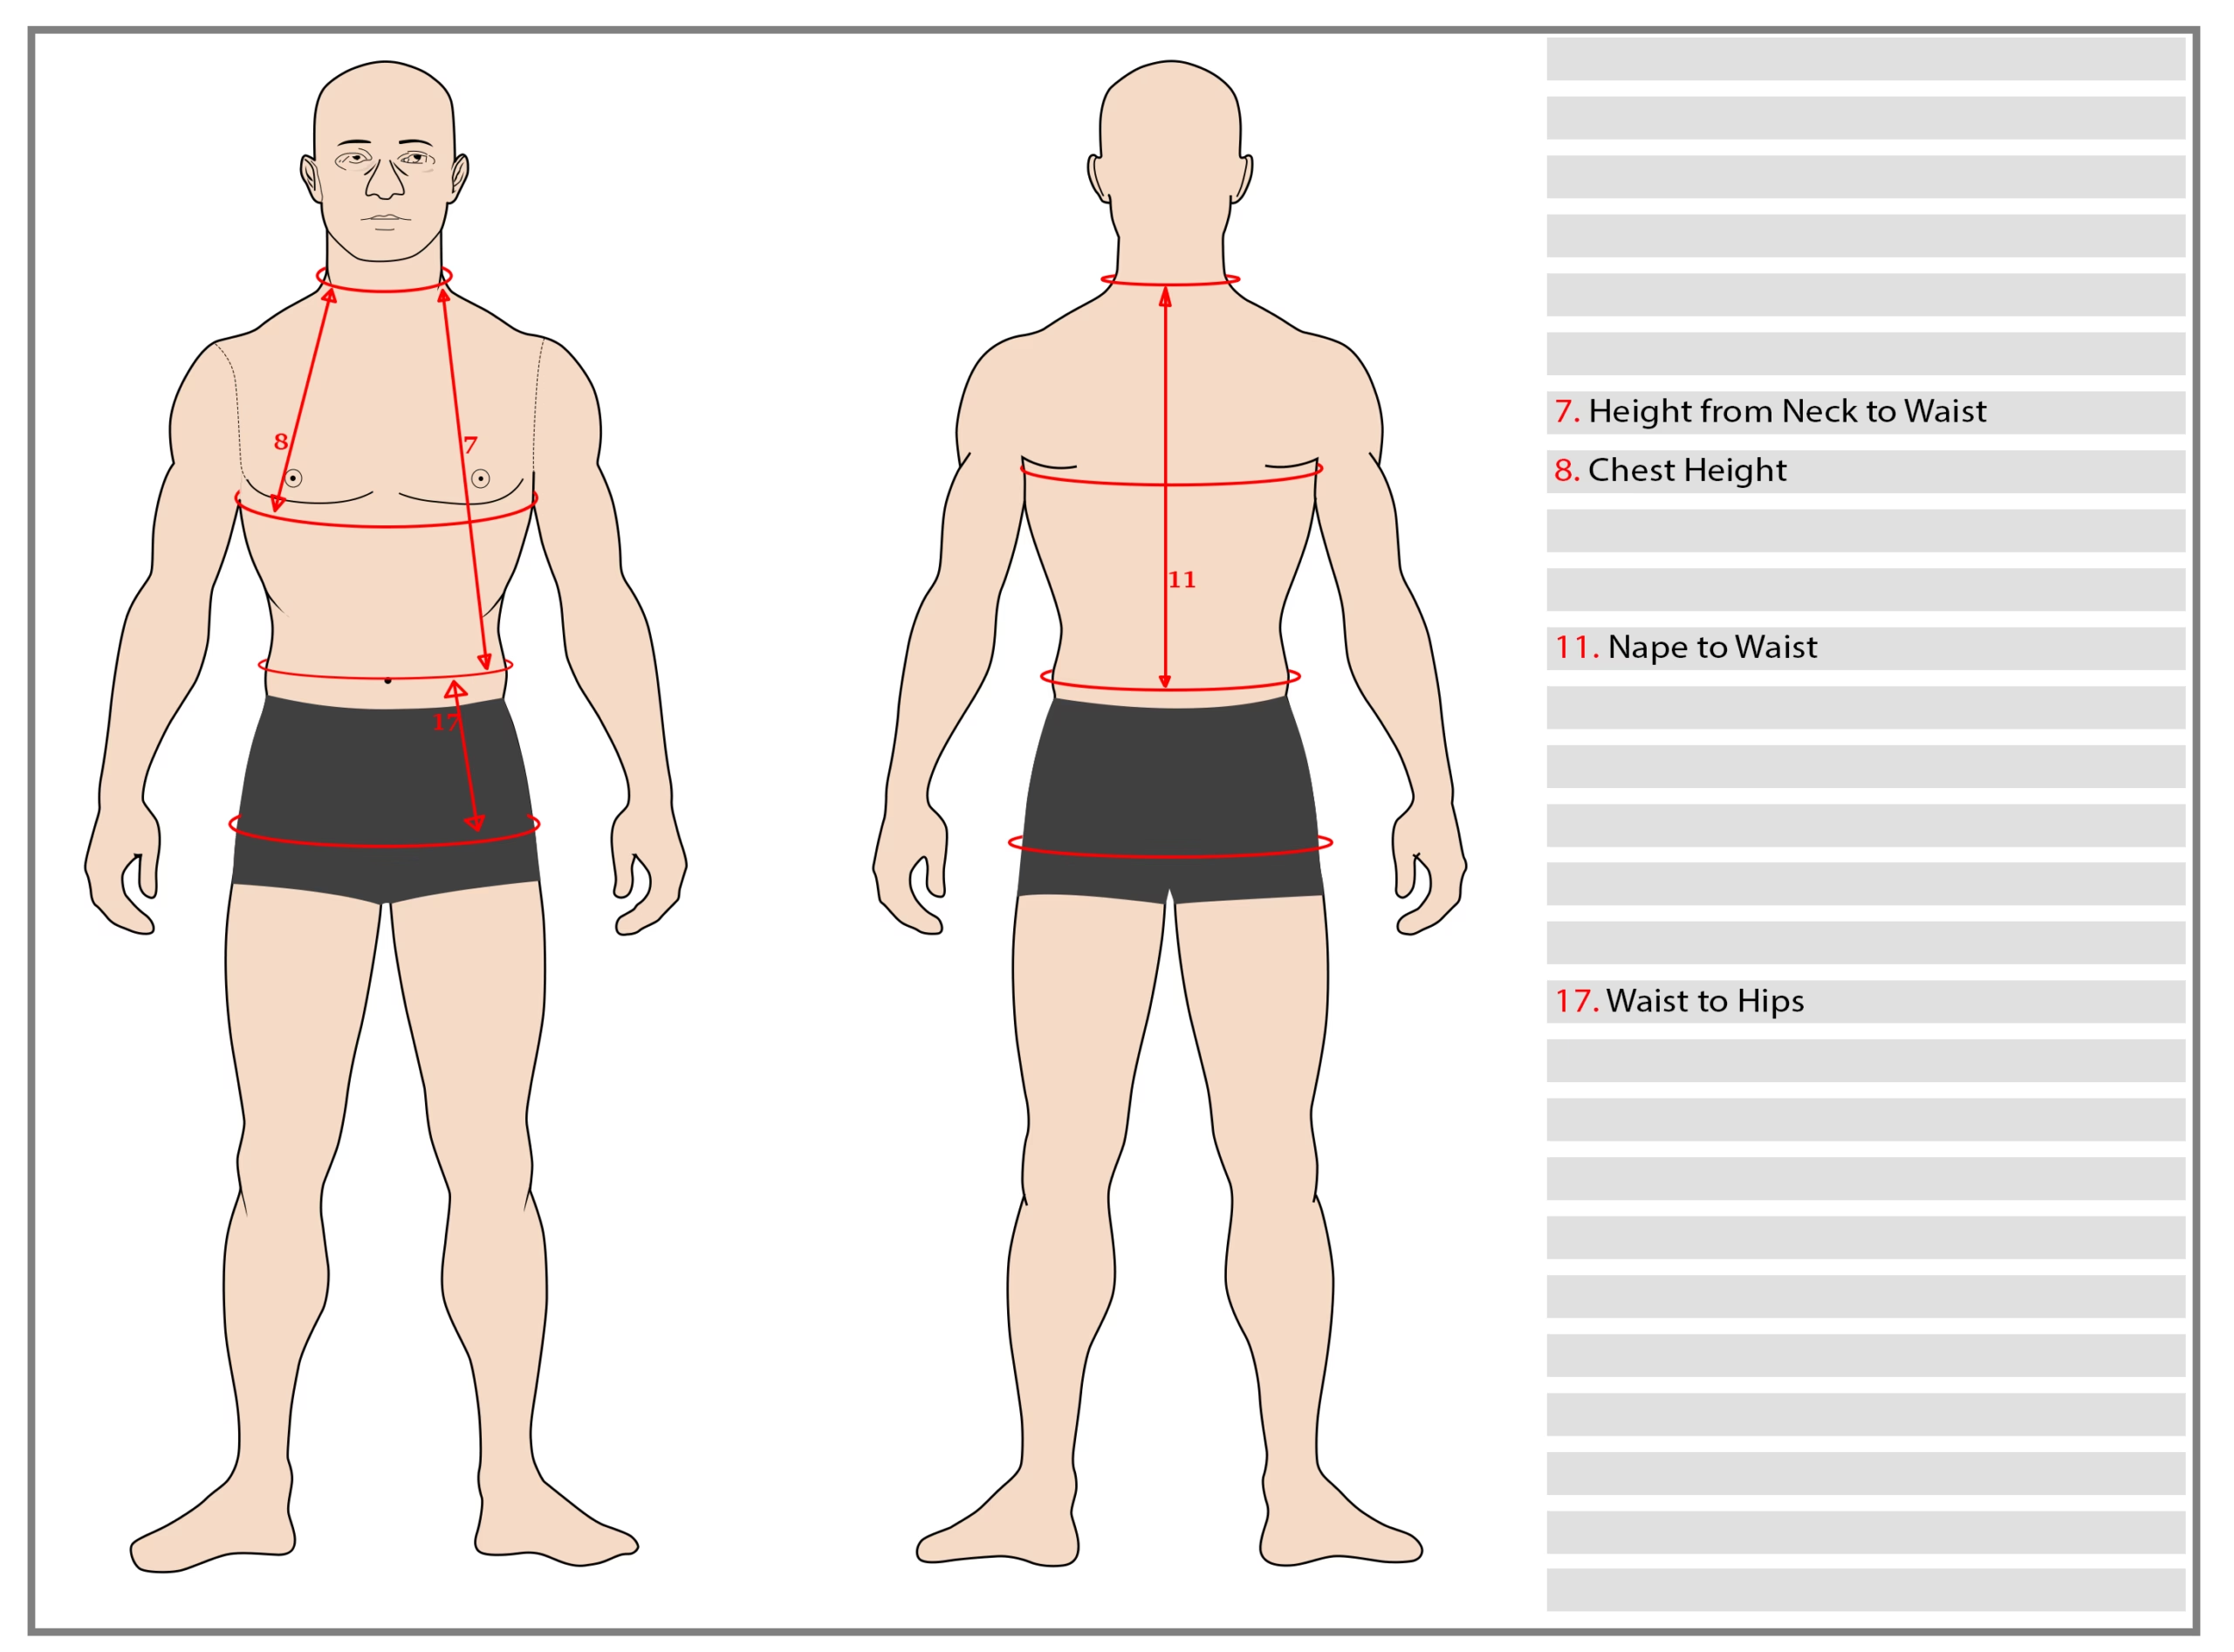
Four vertical rails that set the proportion and balance of your jacket and trousers on your specific torso.
#7 Height from Neck to Waist
Vertically down the front, from the front base of the neck (sternum notch) to the waistline (#10’s position).
- Follow the body contour, not a rigid straight line.
#11 Nape to Waist
Vertically down the back, from the prominent bone at the base of the back neck (the C7 vertebra — chin down and you’ll feel it protrude) to the waistline.
- Trace the spine’s slight curve rather than measuring straight down mid-air.
#8 Chest Height
On the front, measure vertically from the neck point beside the collar down to nipple-line level.
- Determines where the chest’s fullest point sits relative to your neckline — critical for balancing the jacket’s drape on tall vs short torsos alike.
#17 Waist to Hips
Vertical distance from the waistline down to the fullest hip/seal level (matching #16).
- Along the body surface, side of the hip.
Part IV: The Complete Sleeve System (#12, #13, #14, #15, #26)
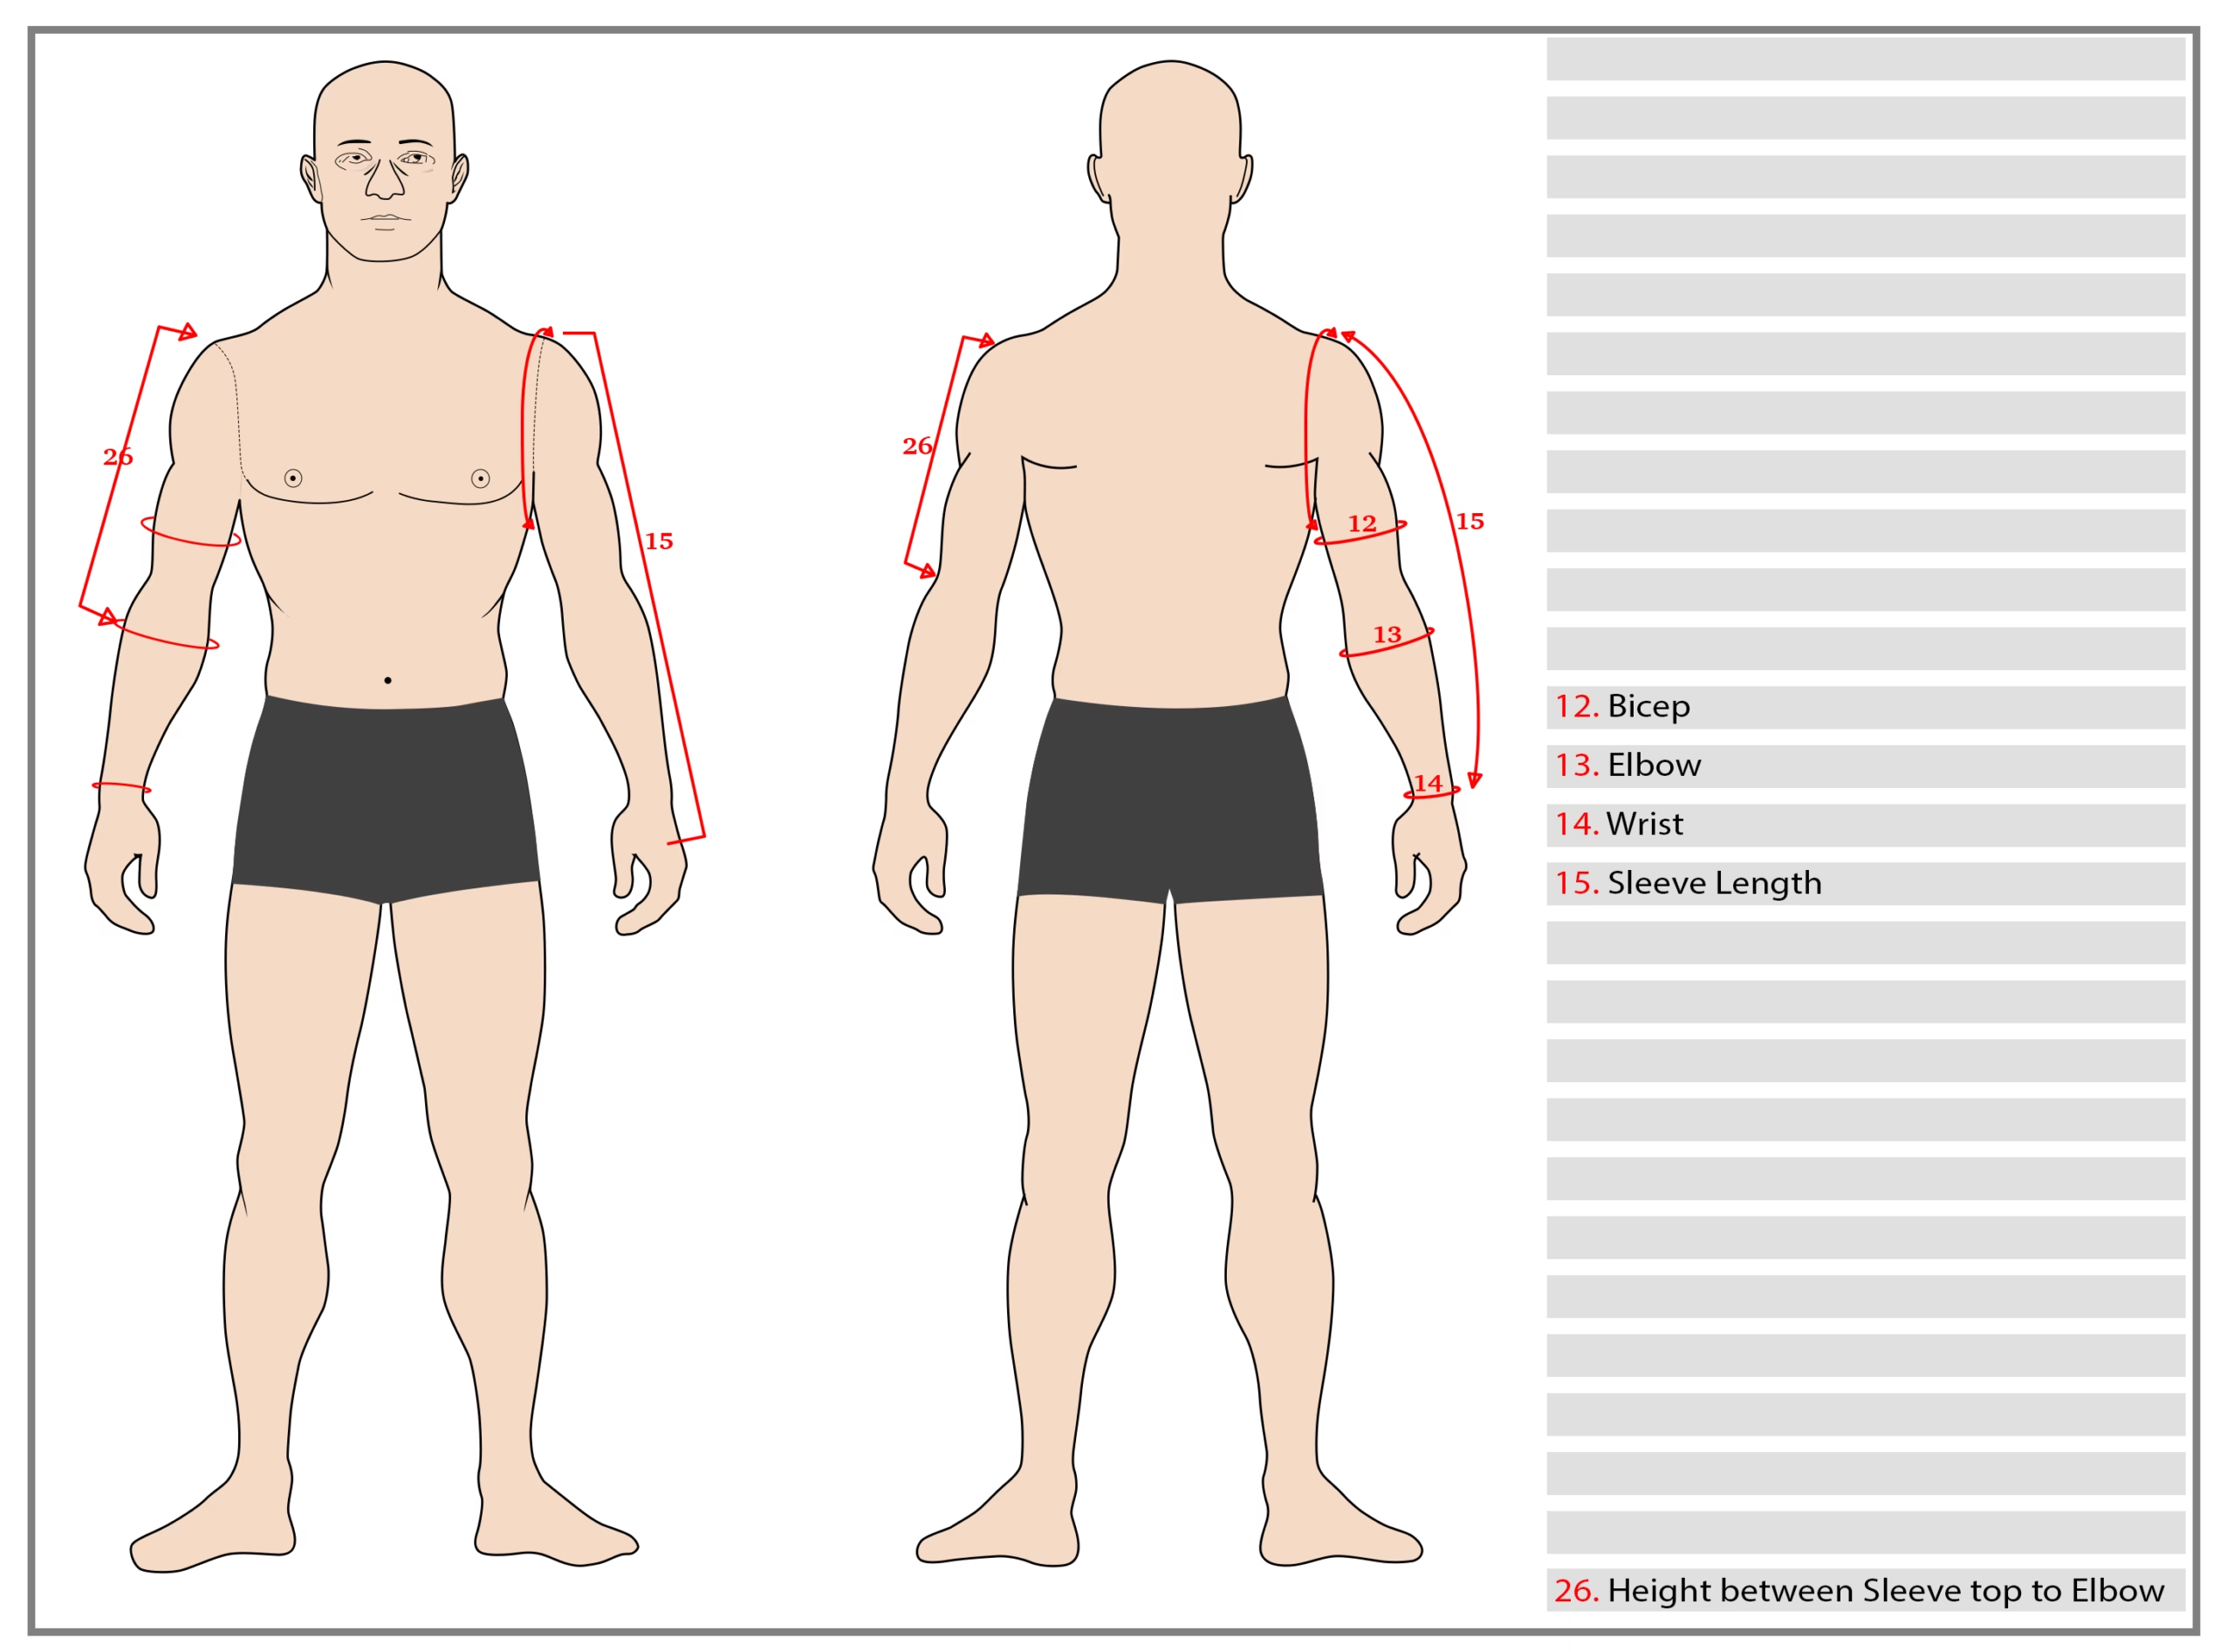
Five readings together shape the entire sleeve — biceps, taper, elbow articulation and hem.
#12 Bicep
Wrap the tape around the thickest point of your upper arm.
- Arm relaxed and hanging naturally — do NOT flex. A tensed bicep adds fake centimeters that become restrictive sleeves.
#13 Elbow
With the elbow gently bent, wrap the tape around its widest arc.
- The bend matters: sleeves need rotating room at the joint, captured only in bent-arm readings.
#14 Wrist
Around the wrist bone — the narrowest cuff reference on the whole chart.
#15 Sleeve Length
- Bend the elbow slightly (~30°, your natural resting angle).
- From the shoulder tip (same landmark as #3), run the tape over the outside of the bent elbow down to the base of the thumb/wrist bone.
- Bent-arm reading is mandatory — straight-arm tape produces sleeves that pull when you drive, type or toast.
#26 Height Between Sleeve Top to Elbow
Along the outer arm: vertical drop from the shoulder tip down to the point of the bent elbow.
- Cross-checks the sleeve draft so the elbow articulation lands exactly where your arm bends — not an inch off.
Part V: Trouser Precision Engineering (#18A, #18B, #19, #20, #21, #22, #23, #24)
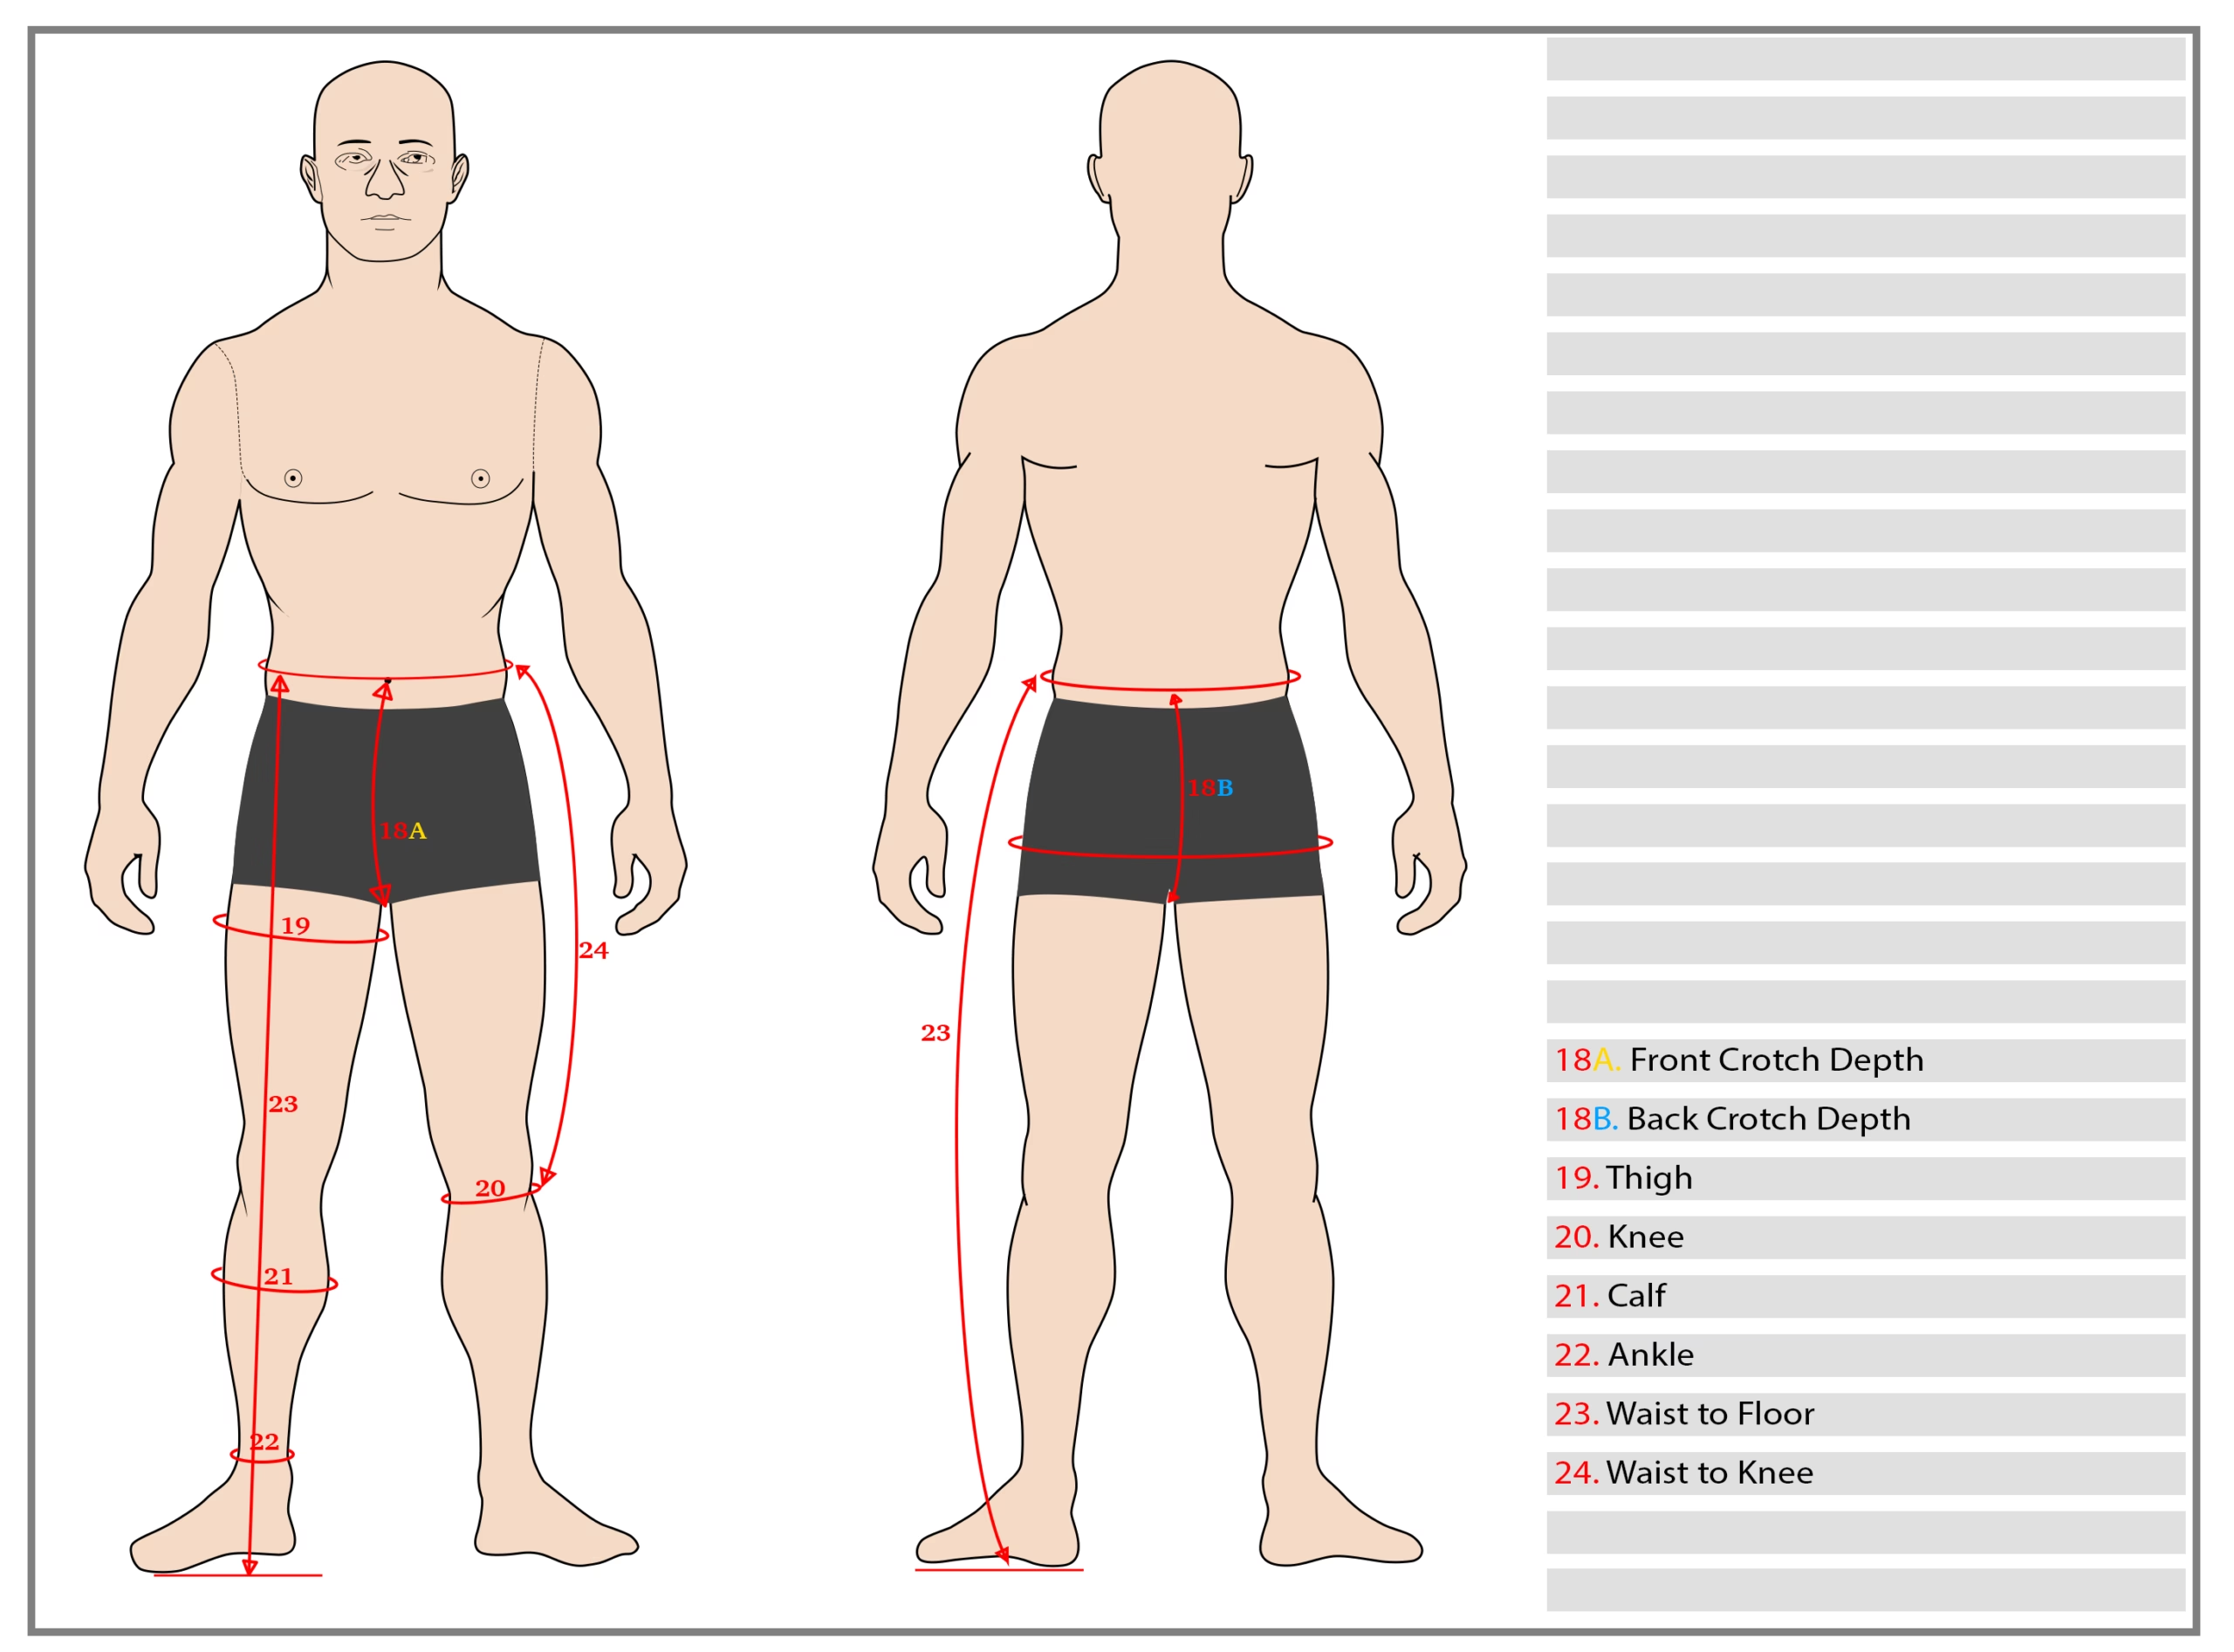
Eight numbers that most online stores never even ask for — and why trousers from proper MTM houses fit differently.
#18A Front Crotch Depth
While seated upright on a flat bench/chair, measure vertically along the front, from your waistband position down to the seat surface.
- Sitting measurement only — standing produces false lengths.
#18B Back Crotch Depth
Stay seated; measure vertically up the back, from the seat surface to the waistband position at your spine.
- The difference between 18A and 18B reveals pelvic tilt — gold data for clean, non-diaper-draping trousers.
#19 Thigh
Standing, weight even on both feet: wrap the tape around the widest section of one thigh, close to the crotch.
- Press snug — don’t leave air pockets that create baggy legs.
#20 Knee
Around the knee’s broadest sweep, leg almost straight but knee soft (not locked).
#21 Calf
Around the thickest belly of the calf muscle.
- Essential for slim tapered trousers without the calf-strangle effect.
#22 Ankle
Around the ankle bone — the bottom boundary of the taper, relevant for turn-ups versus clean hems.
#24 Waist to Knee
Down the outer thigh, from waistband position vertically to the center of the kneecap.
#23 Waist to Floor
Shoes OFF. Down the outer side of the leg, from the waistband position to the bare floor beside your heel.
- Hold the tape taut and truly vertical; end at the contact point where the heel meets the floor.
- Combined with #24, this sets the exact break height of the finished trousers once we add your typical shoe height.
Final Calibration: Three Checks Before You Submit
- The math harmony test. Your four big loops should coexist sensibly: Chest > Waist, Hips > Waist, Hip ≈ Chest ± few cm depending on build. Wildly contradictory pairs usually signal one mis-looped tape.
- The garment cross-check. Lay your best-fitting existing dress shirt flat, measure its chest pit-to-pit and double it — it should land within a couple of centimeters of #6 minus wearing ease. Discrepancy? Re-run the chart chest number.
- The photo-log bonus. Photograph yourself front/side in fitted clothing during the session. Attach the images with your order. Numbers describe volume; photos reveal posture — and posture is what separates “fits” from “flatters.”
Frequently Asked Questions
Is 26 measurements really necessary if other sites ask for fewer? Short answer: yes. Eight numbers approximate a body; twenty-six describe yours. Each additional datum removes another averaging assumption from your pattern — especially crotch depths, calf and armhole, which mass-market sizing simply ignores.
Can one person do this alone without help? Yes. Mirror positioning handles shoulder width and back lines; every remaining measurement is reachable solo. Many clients film themselves on phone video and re-check footage — highly recommended for #2, #9 and #11.
Centimeters or inches? Centimeters, always preferred — finer resolution, no fraction rounding errors. If you must use inches, state the unit prominently on the order and never mix systems on one chart.
What if my numbers seem unusual — very different proportions? Then made-to-measure is exactly designed for you. Unusual ratios are what standard sizing punishes hardest and what bespoke drafting absorbs best. Submit truthful numbers plus your photo-log; let the cutter handle the rest.
How long are my measurements valid? Body mass shifts of ±2–3 kg matter. For future orders, re-confirm the big four loops (#1, #6, #10, #16) — if unchanged, the rest generally stands; if shifted, re-take the affected section (torso I–III or trousers V).
Can someone else take the measurements for me? A partner speeds everything up — especially nape-to-waist and shoulder width. Just share them this guide; the techniques stay identical either way.
From Tape to Tailoring: What Happens Next
Your 26 numbers go straight onto the cutting table — quite literally. Our pattern room drafts against your individual figures, cross-checks the harmony tests above, flags any anomalies for confirmation, then cuts your chosen cloth to your blueprint alone.
It takes 30 minutes. It fits like nothing else ever has.